Updated: November 2025
Pay automation can reduce the need to complete timesheets manually every pay.
It works best where :
- Employees are paid the same amount on a regular weekly or fortnightly pay cycle
- There are no additional pay types allowances required or
- Leave liability recording may not be required.
It is not as useful if :
- Your employee's hours change each pay.
- You have different pay cycles for different employees.
- Employees have regular deductions and allowances
- The quick load options of 'Default pay' or 'Copy last' may work better
![]()
.png?width=52&height=52&name=Info%20-%20Blue%20Block%20(1).png) Pay Automation is not set and forget. It requires User intervention when something disrupts the pay cycle, such as a public holiday, or when there is an open pay on the dashboard.
Pay Automation is not set and forget. It requires User intervention when something disrupts the pay cycle, such as a public holiday, or when there is an open pay on the dashboard.
* Follow this link to find out more about how pay automation works, and what can disrupt your pay cycle.
Let's set up the pay automation, one step at a time:
- Step 1: Set up your default pay day and pay cycle
- Step 2: Check your employees' default standard pay settings
- Step 3: Create a template pay for pay automation
- Step 4: Activate pay automation for this payroll account
- What about correction pays or one-off pays?
Step 1: Set your default pay day and pay cycle
The two settings that must be the same for all employees on pay automation are their pay day and pay cycle length.
Pay automation will not work if your regular employees have different pay cycles, i.e. some are paid monthly and others weekly.
What to do:
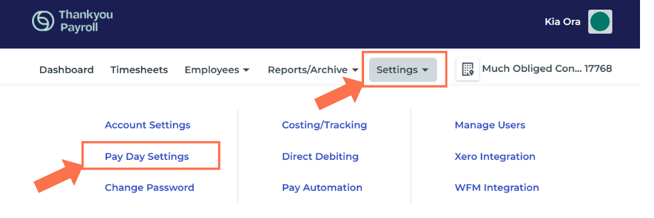
From the dashboard, go to Settings and select 'Pay Day Settings' from the dropdown menu. This will take you to the Pay Day Settings page, where you set the pay day and pay cycle.
- Check that your default pay day is correct. You can update this by selecting a different day if needed.
- All your employees on pay automation will be paid on this same pay day.
- In this example, the employees will be paid on a Thursday.
- The system will default to your selected pay day in this tab (Point 1) provided your deposit is received by 6pm the evening before, regardless of the fees processing option.
- Check that the pay cycle is correct. You can update this by selecting a different pay interval.
- All your employees on pay automation will be paid in the same pay period cycle.
- In this example, all pay automation employees will be paid on a Thursday, fortnightly.
- Update the settings to save whatever changes you've made.

Step 2: Check your employees' default standard pay settings
Pay automation includes all employees who have 'default entries saved in their standard pay row' in their Employee Profile.
Any employees you do not wish to pay every pay should have an empty 'default entries row' in the Employee Settings .
You can manually adjust timesheets or add additional employees to an automated pay run after it has been created. Just remember to deposit any additional funds for this employee's pay.
What to do:
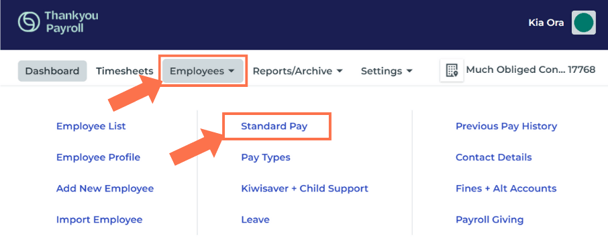
Go to Employees in the top menu bar and select 'Standard Pay' from the dropdown menu. This will take you to the Standard Pay page of your employee, check their default timesheet row settings reflect their regular hours.
Pay Automation only uses this row for the timesheets. No other timesheet rows are created through pay automation.
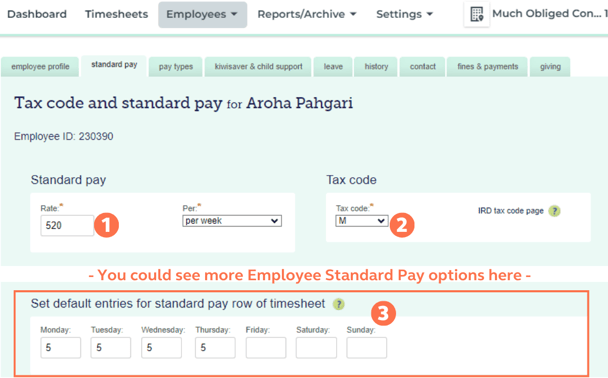
- Check that your employee's pay rate is correct.
- The employee's standard pay can be entered as per year, weekly, or hourly to match their employment agreement. Follow this link for more information on entering standard pay settings for different employment types.
- In this example, the employee's rate is entered as $ 520 per week.
- Check that the employee's tax code is correct.
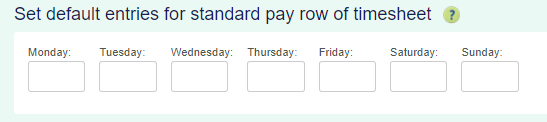
- Check that the 'default entries for the standard pay row of the timesheet' is correct. This should always be updated to reflect any new work patterns.
Update and next the tab to save whatever changes you make. Go through all employee's Standard Pay tab to make sure their settings are correct for inclusion/exclusion from pay automation.
- Every employee who has entries in this row will be included in every pay automation pay run.
- If you don't want an employee to be included their 'default entries row' must be empty.
Step 3: If you have not processed earlier pays through Thankyou Payroll or are changing your pay cycle.
Create a pay to set your dates going forward.
Create a pay to check that everything is set up correctly. This will also give you the amount needed for your automatic payment to the Thankyou Payroll Trust account.
What to do:
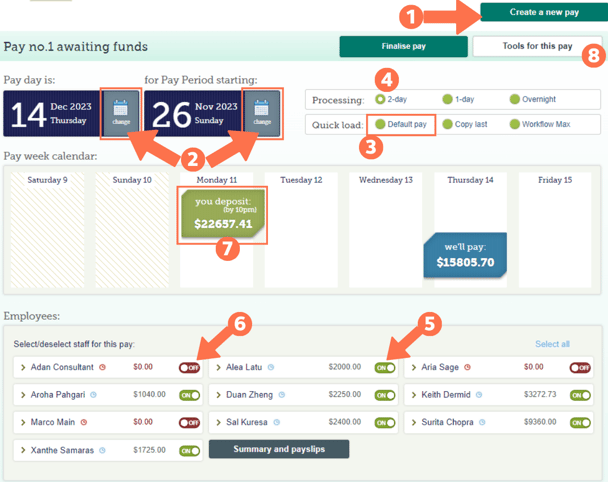
- On the dashboard, create a new pay by clicking the 'Create a new pay' button.
- Check that the 'pay day' and the 'pay period starting date' are both correct.
- You can update these by clicking on the calendar icon next to each.
- Click the 'default pay' option in the Quick Load menu section. This will create a pay run based on the 'default entries for the standard pay row' for your employees..
- What you see on this dashboard sets the start point for your future pays.
- Pay Automation priorities your pay day. Provided your deposit is received by 6pm the evening before your selected pay day a pay will be created and process.
- All employees with 'default entries in the standard pay row' of their Employee Profiles saved will be included in this pay.
- It is important to check that the employees you want to pay through pay automation are toggled on and have the correct pay amount next to their name.
- If employees are missing, it means that they will not be included in automation pay runs.
- To include them in pay automation, enter their 'default entries for the standard pay row' in their Employee Profile. See step 2.
- Employees who are toggled off will not be included in pay automation.
- To pay these employees, you can add them manually to a pay run, or do a separate manual pay for them as needed. Remember to deposit any extra funds if you add more employees.
- The 'You Deposit' amount is the amount required for your automatic payment.
- When we apply a deposit to your client account, your pay automation cycle will be triggered.
- Any deposit will create the next pay in your cycle, but a pay will not process until it is fully funded.
- WARNING: If there is an unprocessed pay on the dashboard. Automation will not overwrite this pay or create a new pay.
- Keep this pay on the dashboard to be processed with your first deposit.
- Your second deposit will trigger the pay automation cycle for the next pay.
You must set up an Automatic Payment or make a deposit from your bank account for Pay Automation to work.
*Pay automation cannot be funded by Direct Debit.
Remember to update and save settings if you change anything in the Employee Profile or Settings Tabs.
Please note that you may need to adjust your automatic payment when a public holiday falls on your Automatic payment day , immediately prior to your regular pay day, if you change an employee's pay rate, or adjust KiwSaver contributions.
*We recommend that you create your next pay to confirm the new deposit amount when making changes.
Thankyou Payroll will notify you via email if a pay is not fully funded.
Step 4: Activating pay automation
Now that you have everything set up you can activate pay automation for this payroll account.
What to do:
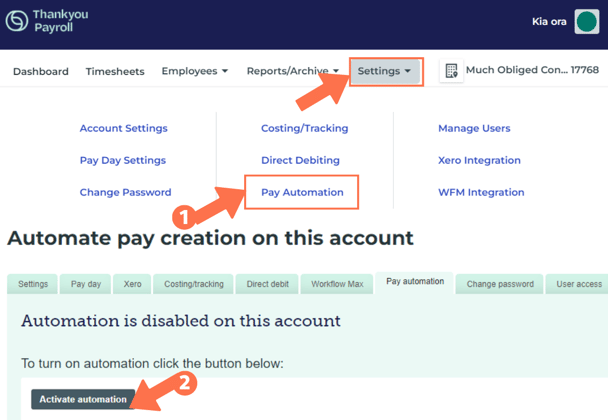
- Go to Settings in the top menu bar and select 'Pay Automation' from the dropdown menu. This will take you to the pay automation activation page.
- Now click the 'Activate automation' button. Your pay automation has now been activated and will be triggered by the next deposit to be assigned to your client account.
You only have to activate pay automation once.
What about correction pays or one-off pays?
After a manual pay, one-off payment, or a correction pay, we recommend you create your next regular pay and check that the pay day and period starting day are both correct. Create the next pay run by pressing the "Create a new pay" button, followed by the "Default pay" button to check that the dates fall on the correct days. (See step 3). You can leave this pay run open on the dashboard .
 Warning: If your deposit arrives on what would have been your pay day, or of there is an unprocessed pay open on your dashboard, your pay automation will not work as expected.
*Please contact out Help Desk if you are unsure.
That is it! You have set up pay automation for this payroll account. Now that is making your payroll work for you!