Updated: September 2023
Follow this article to set up the Standard Pay Tab in the Employee Profile correctly when wishing to pay a monthly salary.
- For paying the same amount in a monthly salary, the setting has to be based on calendar months (1st-31st of the month). Continue in this article to find the following:
- When paying the monthly salary that straddles pay periods (21st Jan-20th of Feb for example), you will have to set up a 4-weekly pay cycle, The salary could differ each month based on the number of workdays, but the value of each day will be the same. Follow this link to our dedicated article walking you through this setup.
Paying a Calendar-based Monthy Salary
.png?width=52&height=52&name=Info%20-%20Blue%20Block%20(1).png) Using the Monthly Calendar setting is the only way to pay the employee the same amount every month. What the system does is divide the fixed monthly amount by the number of workdays, so the value of a day will be different, from month to month.
Using the Monthly Calendar setting is the only way to pay the employee the same amount every month. What the system does is divide the fixed monthly amount by the number of workdays, so the value of a day will be different, from month to month.
Setting up the Standard Pay Tab
In the example below, the employee is on a salary of $ 84,000 per year and will be paid on a 12-month cycle. Their actual hours worked will not affect the monthly pay, which is $84000/12 months = $ 7,000 Gross each month (irrespective of the number of workdays).
Let's investigate the Standard Pay Tab settings in their Employee Profile:
Complete the rest of the Employee Profile and SAVE the Profile Settings. Now you are ready to add this employee to a pay.
Creating a Timesheet for a Monthly Pay
Return to the dashboard to create a new pay. Toggle the employee's name on to create their timesheet.
With a monthly pay, the timesheet has to start from the first of the month and include every workday up to (and possibly including) the last day of the month.
Let's have a look at an example timesheet:
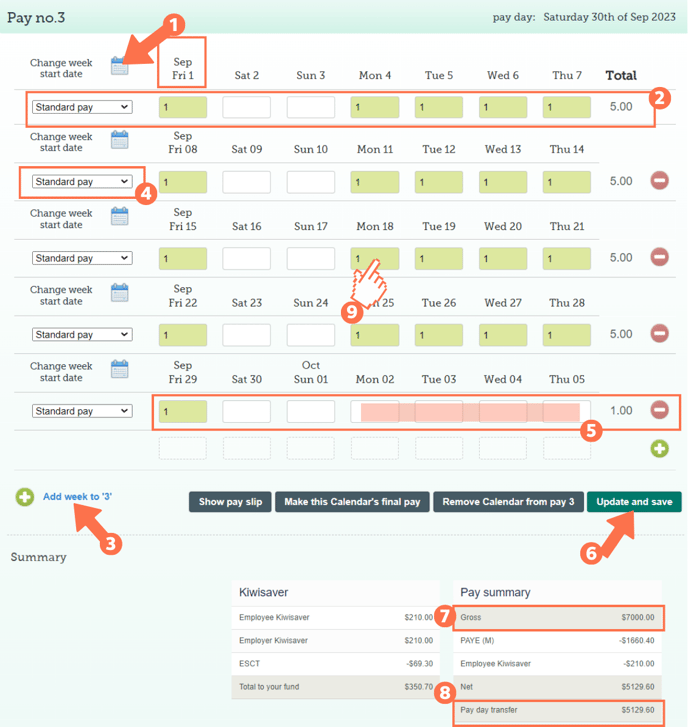
- Start the timesheet from the first day of the month. If this is not the case, select the calendar next to the 'change week start date' heading and select the 1st of the month.
- You will see that the first timesheet line is already pre-populated with the timesheet entries as set in the default setting of the Employee Profile. This is correct. You will need to add more lines of the same kind to complete a full calendar month in a single timesheet.
- In the bottom left of the timesheet, you will find the Green + sign 'Add week to (pay number)'. Click this to add a new line to the timesheet.
- The Green + sign to the right of a timesheet row adds another row to this week (for sick leave for example or other pay types that applies to that same timeframe as the row)
- Select the 'standard pay' pay type from the dropdown box to the left of this new timesheet line.
- You will notice that the dates for these timesheet entries follow on from the previous line.
- This line should also pre-populate with the standard entries once you've selected the 'standard pay' pay type from the list.
- Continue to add lines to the timesheet and fill them in as you've just done till you reach the end of the month.
- If the end of the month is part way through a timesheet week, you need to remove the timesheet entries for the next month from this line.
- In the example above, the last line includes entries from the 1st October to 5th October. As these are in the following month, they were deleted from this timesheet before saving.
- Update and save the timesheet. Your timesheet boxes will be green when saved, as in the example.
- Check that the Gross amount is the expected monthly salary.
- In this case we've calculated that a Gross Annual Salary of $84000 / 12 months = $7000 per month. This correlates with the gross amount in this timesheet.
- The pay day transfer amount is what the employee will receive in their bank accounts.
- You can bring up the costing screen and check the value of a single day by left clicking in a timesheet entry.
- This is helpful as paying an employee a monthly salary of this nature calculates the value for each workday based on the Gross divided by the number of workdays in this month.
- Gross ($ 7000)/ workdays this month (21) = $ 333.33 per day
 Impotant to Note: As the individual value of a day changes per month, you have to do correction pays in the actual month's timesheet so the value of a day will be the same.
Shortcut options available with Calendar-based Monthly Salaries
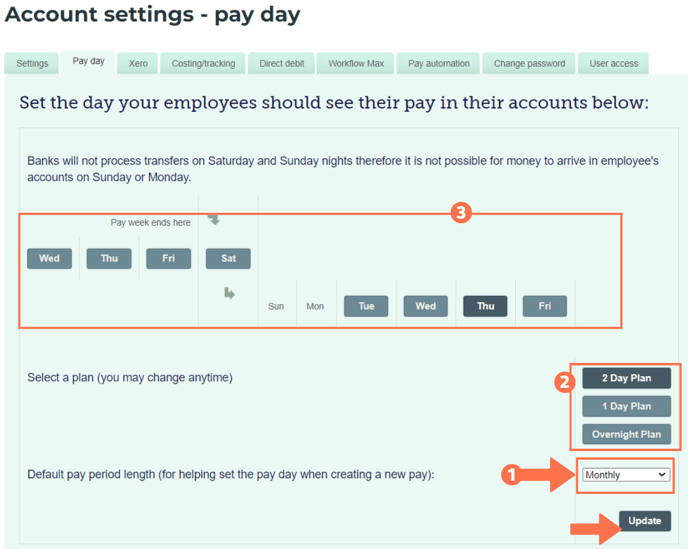
- If all of your employees are paid monthly salaries, you can set your default pay period to monthly in your pay day settings (1).
Whenever you then create a pay on the dashboard, simply set the pay period start date to the 1st of the month (1) and click the default pay button (2).
- You can also automate monthly pay cycles as long as your automatic payment to us comes on the same day of the month relative to your default processing plan.
For example: If your default pay day is the first Thursday (3) of every month and you are on the 2-day slow processing plan (2) - your automatic payment should reach us by the Monday of payment week.
.png?width=688&height=82&name=CalendarMonth_DashboardQuickSettings%20(1).png)
That is it! You have now successfully set up this employee to receive the same monthly salary every month. As easy as that!