Correction Pays - Making a Correction to a Past Timesheet
Correction pays are done to update pay types or hours on an already-processed pay. This article walks you through updating your employee's pay history correctly.
Life is unpredictable and even the best-laid plans could change without our foreknowledge. Payroll is no exception. If you have already paid out e.g. annual leave to your employee and they return with information that they were sick during a portion of this time, you need to be able to change that original pay to issue 'sick leave' instead of 'annual leave'.
Barring time travel, our system can do a correction pay to update pays that have already run. Here is what you need to know:
- Correction Pays are done as a one-off pay outside of your regular pay cycle.
- You can load up to 8 weeks to a single Correction Pay timesheet.
- The 8 weeks do not need to be in order, as you select the week start date for each week in the calendar next to its row.
- There is no limit to how far back a correction can be done. However, if the employee's work pattern has changed, follow this link to our help article showing you how to do do this correction.
![]() Correction pays use the current pay values, so will not take into account past pay rates.
Correction pays use the current pay values, so will not take into account past pay rates.
*If you are correcting leave from a long time ago, average payrates may have been applicable instead of ordinary rates which is what your employee was paid. Please get some advice from Employment New Zealand as this will not comply with the Holidays Act.
Doing a Correction Pay
![]() With a correction pay for multiple dates, you don't have to pick an exact 'Pay Period Start Date' for the pay on the dashboard. Selecting the calendar icon in the timesheet will let you select the dates for each individual week's entry.
With a correction pay for multiple dates, you don't have to pick an exact 'Pay Period Start Date' for the pay on the dashboard. Selecting the calendar icon in the timesheet will let you select the dates for each individual week's entry.
*If you prefer, you can use the pay period of the first pay you are correcting as the 'Pay Period Start Date' for the pay on the dashboard, which will automatically start the first timesheet line with this week.
Let's look at doing a correction pay for three payslip examples:
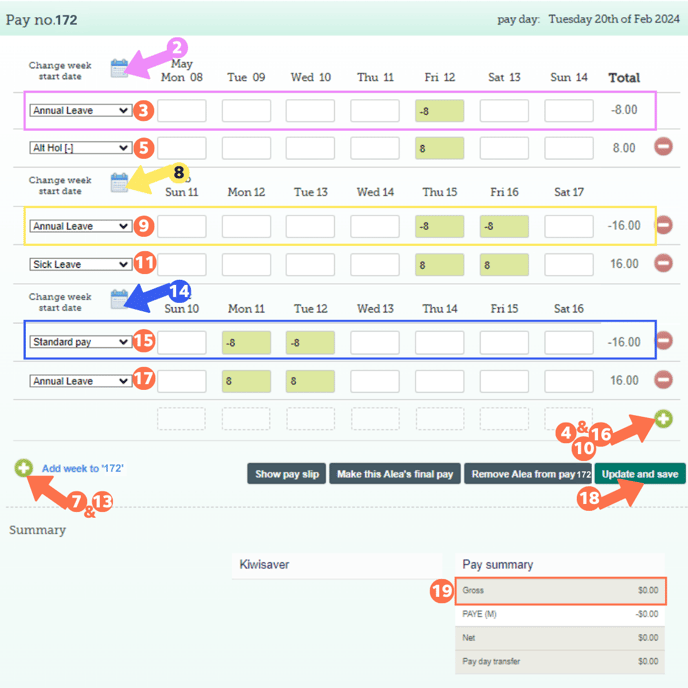
- In this first payslip, the employee should have used their Alternative Leave allocation on the 12th May instead of Allocated Leave. Let's add this to the timesheet first:
- Create a one-off pay on the dashboard outside of your regular pay cycle and toggle on the employee in question. Go to their timesheet and select the week start date to be the same as the week of the payslip in question.
- Click the calendar icon and pick the week's start date from there. The dates of the entries in this correction pay must be the same as the dates in the original pay.
- For the first timesheet row, select the payment type to be corrected. In this example, it is: 'Annual Leave'. Fill in the negative value of the hours (with a minus sign) for each entry to be updated in that row. This will add back the leave entitlement to the leave balance.
- As an example, for the 8 hours on Friday 12th May, enter -8 in the correction timesheet.
- Add a new row to the timesheet by clicking the green +sign on the right.
- This will add a second row to the timesheet for the same week.
Select the pay type the entry should have had: For alternative leave taken, that is 'Alt Hol (-)' from the dropdown menu on the left of this row. Now fill in the hours that should have been in the original entry in that row.
- These hours are positive values. Do not add a plus sign, only the numbers.
- You can update and save the timesheet if you have no more corrections needed.
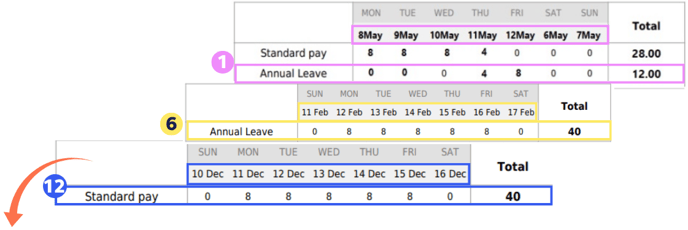
Let's load the second payslip. Here, the employee was sick on Thursday and Friday during their Annual Leave period:
Load a NEW WEEK to the timesheet by clicking the green +sign at the bottom of the timesheet.
This loads a whole new week with different dates to this timesheet.
Select the week start date from the calendar icon above this row to be the same as the week of the payslip in question.
For this timesheet row, select the payment type to be corrected. In this example, it is: 'Annual Leave'. Fill in the negative value of the hours (with a minus sign) for each entry to be updated in that row. This will add back the leave entitlement to the leave balance.
As an example, for the 8 hours on Thursday 15th February, enter -8 in the correction timesheet.
Add a second row for the same week to the timesheet by clicking the green +sign on the right.
Select the pay type the entry should have had: that is 'Sick Leave' from the dropdown menu on the left of this row. Now fill in the hours that should have been in the original entry in that row.
These hours are positive values. This will deduct the number of days from their sick leave balance.
You can update and save the timesheet if you have no more corrections needed.
Let's load the third payslip. Here, the employee was wrongly paid standard pay for Monday and Tuesday when they should have been paid Annual Leave:
Load a NEW WEEK to the timesheet by clicking the green +sign at the bottom of the timesheet.
Select the week start date from the calendar icon above this row to be the same as the week of the payslip in question.
For this timesheet row, select the payment type to be corrected. In this example, it is: 'Standard Pay'. Fill in the negative value of the hours for each entry to be updated in that row.
As an example, for the 8 hours on Monday 11th December, enter -8 in the correction timesheet.
Add a second row for the same week to the timesheet by clicking the green +sign on the right.
Select the pay type the entry should have had: that is 'Annual Leave' from the dropdown menu on the left of this row. Now fill in the hours that should have been in the original entry in that row.
These hours are positive values. This will deduct the number of days from their allocated leave balance.
You can update and save the timesheet if you have no more corrections needed.
Update and Save this timesheet. The timesheet boxes will be green when the timesheet has been saved, as in the example.
If you get a pop-up message telling you that 'Gross wages are currently less than 0...', OK the pop-up message and check your calculations again.
Please contact our support team for assistance.
The 'Gross balance' for the correction pay will be $0, and you are good to go. After you have emailed the Customer Success Team and the correction pay has been processed, the employee's leave balances will be updated in the system.
Important to note:
|
How the timesheet entry on a correction pay works:
|
Always left click in each timesheet entry field after saving the timesheet (green boxes) to check the correct number of days/part days is being taken/added back to leave balances.
e.g. Remember that correction pays use current work patterns to determine day sizes, so if the employee worked 6-hour days when the mistake was made and now only works 4-hour days, entering -6 will add back 1.5 days to their leave balance and not 1 day as intended! The timesheet will zero out, but the employee's leave balances will be wrong. Follow this link to find out more.
Please contact our Customer Care Team if you are ever unsure about this. We are here to help you correct these types of errors.
![]() A zero-pay will not run by itself. Please write an email to our Customer Support Team at help@thankyoupayroll.co.nz to process this request. Include the pay number and a brief description of the reasons for the correction pay in the email.
A zero-pay will not run by itself. Please write an email to our Customer Support Team at help@thankyoupayroll.co.nz to process this request. Include the pay number and a brief description of the reasons for the correction pay in the email.

