Updated: December 2023
Final pay is a higher risk area in payroll as it involves different payment types and calculations. This article takes you through creating a final pay for your departing employee in our system.
.png?width=52&height=52&name=Info%20-%20Blue%20Block%20(1).png)
Other than leave, there is no 'special calculation' for a final pay. It is calculated on the type of payment made, and what is required based on legislation and the terms of individual employment.
Contact Employment New Zealand or MBIE if you have questions regarding the terms of a final pay.
A final pay can be added to a regular pay run on the dashboard. The other employees in the pay run will not be affected by the terminated employee's final pay status.
For a Final Pay to set, this timesheet must be the ONLY timesheet for this employee on the dashboard. If this employee still has an unprocessed timesheet in another pay, the final pay will not set.
You can either:
- update that unprocessed timesheet to become the final pay, OR
- wait for the pay to process and create a new final pay timesheet.
Let's create the final pay, one step at a time:
- Why set the final pay, and not just a normal pay?
- Step 1: Entering hours owed
- Step 2: Check Employee Leave Balances and Leave Liability
- Step 3: Add Alternative Leave owing
- Step 4: Add Public Holidays if applicable
- Step 5: Set the Final Pay
Why set the final pay, instead of doing a normal pay?
Setting a 'Final Pay' in the system has three distinct advantages:
- All leave entitlements are calculated and included correctly as per legislation.
- The employee is removed from your active employee list and archived so you still have access it in the future if needed.
3. We inform the IRD that this employee's employment with you has ended - their end date is filled through payday filing.
If your employee is a contractor, or a casual worker without a leave balance owing, you still need to set their final pay to archive their profile.
Now that you know why you should set the final pay, let's get into setting up the timesheet.
Step 1: Enter standard hours
- Enter any standard hours for this employee's last pay period (if any).
- If you require an additional week, click the 'Add week' plus below the timesheet lines. Select 'Standard pay' as the pay type.
- In this example this is the employee's final date. Any entries after this date are removed from the timesheet.
- Update and Save the timesheet entries.

Step 2: Check Leave Balances and Leave Liability
Only add Annual Leave or Holiday Pay to the final timesheet, if the employee has taken paid leave within this timesheet period (then only add the days taken as usual).
*The system automatically calculates any leave owing when you press the 'Set final pay' button. This is paid out in the final pay and shown as a distinct entry on the payslip.
Use the Leave Liability Table under the timesheet to check the employee's leave balances and liability are correct. Follow this link to find out more about the leave liability table.
Everything marked in pink in this example will automatically be calculated and paid out by the system. No need to add this manually to the timesheet.
- The number of allocated annual leave days (b). They will be paid at the rate calculated on the final day.
- This number is needed to check if a public holiday must be included in this final pay, as a positive number here extends forward - See Step 4.)
- The 8% accrual figure (c) is what leave has accrued since their last leave anniversary.
- If the employee has a Holiday Pay balance (d), this will also be paid out in the final pay by the system. There should not be both Annual Leave and Holiday Pay.
- If the employee has any days of alternative leave owing (e), you must add these to the timesheet before the final pay can be set.
- This is the ONLY leave you need to manually add to the timesheet. (See Step 3 below.)
- This is the current total leave liability (f) that will be paid out to this employee on setting the final pay.
- Note that these numbers will update and as you add and save entries to this timesheet. The final numbers will be calculated when you press the 'Set final pay' button.
.png?width=670&height=349&name=Final%20Pay_LeaveLiability_Alea%20(1).png)
Unless otherwise stated in the employment agreement, the sick leave balance does not have any monetary value to the employee and is not paid out in the final pay.
Step 3: Add Alternative Leave Owing
Alternative Leave owing is calculated based on the final day as per the Holidays Act. You can always pay more than the base rate of the Holidays Act, but not less.
Add a new row to the timesheet by clicking the right 'Add row' + sign. This will add an additional row to the final week of the timesheet.
Select 'Alt Hol (-)' as the pay type from the dropdown menu.
Go to the box directly below the final day (a) in the timesheet. This is where you will add the number of Alternative Leave days owing.
In this example, the employee has 2 alt leave days in their leave liability table (See (e) in the table).
The number of regular hours worked on a Wednesday - their final day (a) is 8. So to comply with the Holidays Act, the value of the Alternative holidays will be based on an 8-hour day.
Calculation: 2 days x 8 hours per day = 16 hours. Enter 16 hours into the timesheet box.
Update and save the timesheet.
Left-click in the entry box to check the costing screen values for this entry.
This is the value paid for the alt leave. Check that this is correct.
The number of standard hours for this weekday is shown here. Check that you've used the correct hours calculation.
These days should be paid at the employees 'Ordinary Rate', or the 'Average daily rate' if the ordinary rate is not calculable.
Check that the correct number of days will be deducted from the Alternative leave balance to make it zero (e).
.png?width=670&height=316&name=FinalPay_AltHol_Standard%20(1).png)
.png?width=670&height=519&name=FinalPay_AltHol_Costing_Alea%20(1).png)
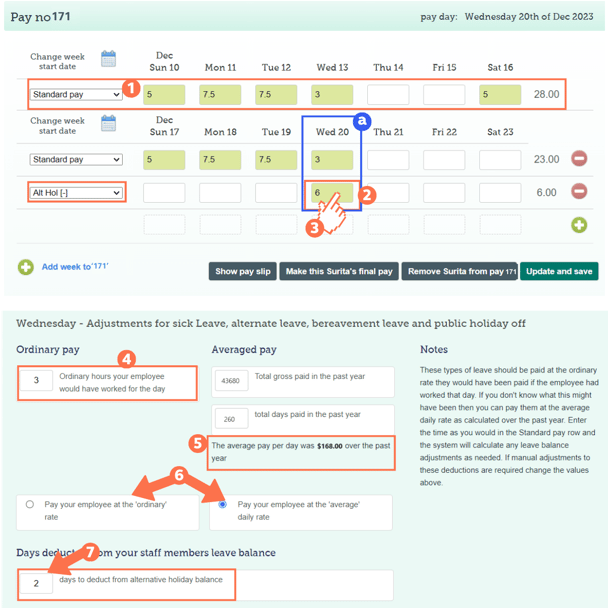
Employee with Variable Hours:
This employee has variable standard hours during their pay period.
Enter their Alternative Holidays owing in the same way as the first example. To comply with the Holidays Act, this must also be based on the standard hour value of the last day.
In this example, the employee has 2 alt leave days in their leave liability table.
The number of regular hours worked on a Wednesday - their final day (a) is 3. So to comply with the Holidays Act, the value of the Alternative holidays will be based on a 3-hour day.
Calculation: 2 days x 3 hours per day = 6 hours. Enter 6 hours into the timesheet box.
Left-click in the entry box to check the costing screen values for this entry.
The number of standard hours for this weekday is shown here. Check that you've used the correct hours for the calculation.
- If paid at the ordinary rate, this employee would receive $90 per day of alternative leave paid out. As there is variation in the pay period and if you want to do better than the base rate in the Holidays Act, you can switch to paying at the 'average daily rate' here.
- This employee would then receive their average daily rate of $168 for each day of alternative leave paid out.
Here you can switch between using the 'Ordinary rate' if calculable, or the 'Average daily rate'.
The number of days deducted from the alternative leave balance is still 2 days.
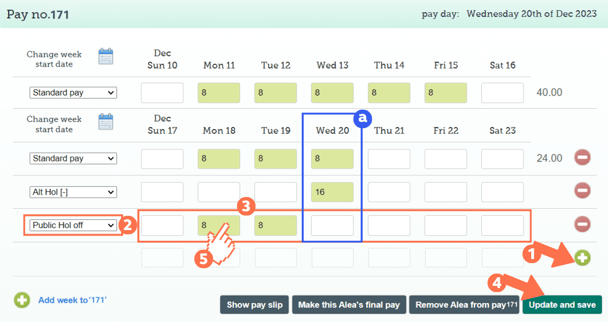
Step 4: Add Public Holidays if applicable
The Allocated Annual Leave Balance (b - in the leave liability table example) extends past the final day. You must only add public holidays if:
- The public holiday falls within this extended allocated annual leave period, AND
- this public holiday falls on what was an otherwise working day for this employee.
.png?width=670&height=324&name=All_AL_Extending%20after%20Final%20Pay%20(1).png)
In this example, the employee would be paid for the public holiday on Monday only, as the first Friday is not their otherwise working day and any public holiday after the 4th Allocated Annual Leave day count is after this extended period, so also excluded.
Only the Allocated Annual Leave Balance (b - leave liability table) extends forward past the final day. Accrued leave does not extend forward.
Add another row to the last week by clicking the right 'add row' + button.
Select 'Public Hol off' from the pay type dropdown menu.
To comply with the Holidays Act, the public holiday entry must be on the same day of the week as the actual public holiday - e.g. if it is a Monday public holiday, then enter the hours on the Monday in this row.
In this example, the employee has 5 allocated annual leave days, which extends over Christmas and Boxing Day.
Christmas is on a Monday, so the 8 ordinary hours are entered on the Monday in this row.
Boxing Day is on a Tuesday, so the 8 ordinary hours are entered on the Tuesday in this row.
- All public holidays within the extended period can be entered in this one timesheet row. They don't have to be on the actual date, as long as the day is the same.
- Update and Save the timesheet.
You can view the costing screen values for each entry by left-clicking in the entry box.
What if the employee has variable hours?
- Enter the ordinary hours on the day of the week that corresponds with the public holiday.
In this example, the employee has 5 allocated annual leave days, which extends over Christmas and Boxing Day.
Christmas is on a Monday, so the 7.5 ordinary hours are entered on the Monday in this row.
Boxing Day is on a Tuesday, so the 5 ordinary hours are entered on the Tuesday in this row.
You can left-click to view the costing screen calculations for each entry.

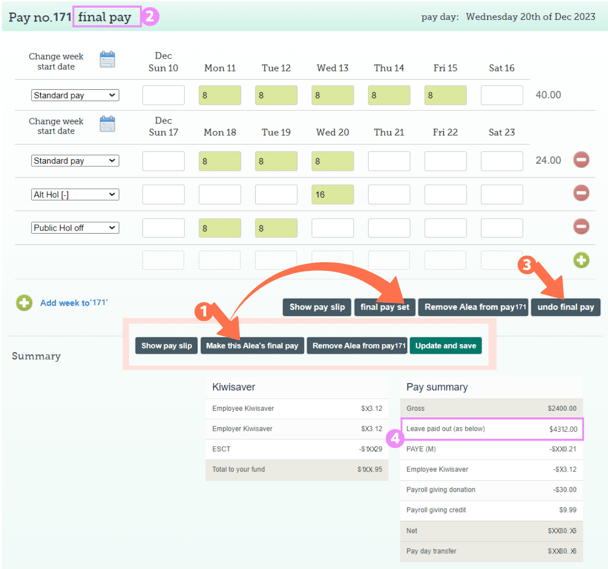
Step 5: Set the Final Pay
All that is left to do is to set this final pay. Here is what you'll see:
To set the final pay, click the 'Make this (employee's name) final pay' button.
- You will notice that this button now becomes the 'Final Pay Set' button.
You will notice the following in a Final Pay Triggered Timesheet:You will see 'Final Pay' in the header of the timesheet.
The 'Undo final pay' button is now available instead of the 'Update and Save' button.
To make any amendments to this final pay, simply click this 'Undo final pay' button.
Update or amend the timesheet as needed. Save and then press the 'Make this the final pay' button again to reset the final pay.
- The Leave Paid Out amount is displayed in the Timesheet summary. You can check this amount by scrolling down to the updated leave liability table below this final pay timesheet.
When you return to the dashboard you will see an 'F' next to the employee's name.
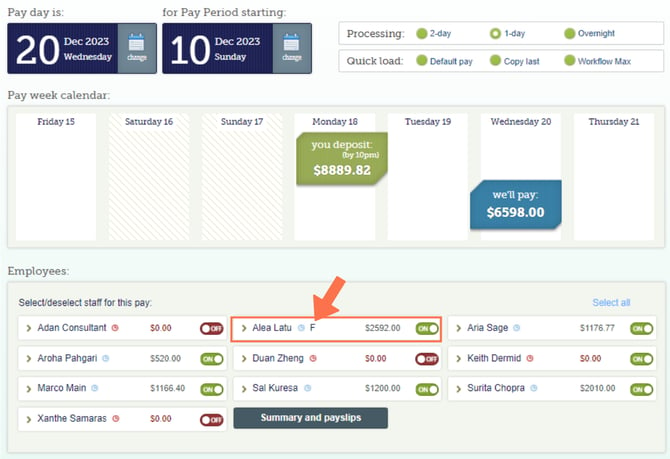
After this pay the employee's profile will be archived and they will no longer be available in the active employee list.
That is it! You have set a final pay for this employee. As easy as that!